
Solving 2006 Yamaha Rhino 660 Problems: Troubleshooting Guide
The Yamaha Rhino 660 is a popular off-road recreation utility vehicle known for its power, durability and aggressive styling. Since its introduction in 2004, the Rhino has developed a reputation as a highly capable trail and dune runner.
However, like any machine, the Rhino 660 is susceptible to mechanical issues and failures – especially when subjected to extreme use and conditions.
In this troubleshooting guide, we’ll explore some of the most common problems faced by owners of the 2006 Yamaha Rhino 660 model, along with steps to diagnose and fix these issues.
Getting to Know the 2006 Yamaha Rhino 660
Before diving into troubleshooting, let’s briefly go over the key features and specs of the 2006 Yamaha Rhino 660:
- Powered by a 660cc liquid-cooled single-cylinder DOHC 4-stroke engine putting out around 40 HP
- Front and rear independent double wishbone suspension provides 9.1 inches of ground clearance
- 2WD/4WD selectable drive modes with diff lock
- Semi-automatic “Ultramatic” transmission
- 1,300 lb towing capacity and 600 lb cargo bed capacity
- Dry weight of 1,069 lbs
- Top speed around 60 mph
This powerful and versatile utility quad is designed for off-road recreation and work applications. But like any machine, problems can develop over time, especially with hard use.
Common Problems with the 2006 Yamaha Rhino 660
Some of the most frequently reported problems with the ’06 Rhino 660 includes –
1. Hard Starting When Hot
Difficulty starting when the engine is already warm is one of the most common owner grievances. As the operating temperature rises, the starter motor works harder to crank the expanded metal components. This extra load can exceed an aging battery’s cranking capacity.
Potential Causes
- A weak battery can struggle to deliver sufficient current when hot due to increased internal resistance.
Troubleshooting Tips: Check battery voltage when hot, load test battery, and replace if over 3 years old or failing test.
- As engine components expand with heat, the starter motor has to work harder to rotate the engine.
Troubleshooting Tips: Verify that the starter relay and solenoid are operating properly when hot.
- Corroded or loose battery connections cause high resistance, inhibiting current flow.
Troubleshooting Tips: Clean any corrosion on battery terminals to reduce resistance. Tighten connections.
- Wear, damaged brushes or commutator issues in the starter motor reduce its efficiency.
Troubleshooting Tips: Test starter operation when cold and replace if worn components are found.
2. Loss of Power
Lack of throttle response and diminished top speed are common grievances from Rhino 660 owners. The engine feels underpowered, especially when climbing hills or towing loads. This typically occurs after some period of use.
The loss of power is most apparent when the engine is put under load. So, the Rhino struggles to reach desired speeds and bogs down easily. This lackluster performance takes away from the overall riding experience.
Potential Causes
- A clogged air filter restricts airflow into the combustion chambers, reducing power.
Troubleshooting Tips: Inspect and replace the air filter if it is excessively dirty.
- Fouled injectors cannot properly atomize the fuel, decreasing combustion efficiency.
Troubleshooting Tips: Use fuel injector cleaner first, and replace injectors if needed.
- Low compression from worn piston rings or faulty valves reduces explosion pressure.
Troubleshooting Tips: Do a compression test to identify any low cylinders or leaks.
- Slipping belts or clutch plates cannot transmit full engine power to wheels.
Troubleshooting Tips: Check CVT belts, rollers, and clutches for signs of wear. Replace damaged parts.
3. Overheating
The temperature gauge climbing steadily or spikes into the hot zone are clear signs of engine overheating issues. This typically occurs after prolonged idling or pushing the Rhino hard in high ambient temperatures.
Overheating can accelerate wear in engine components and lead to catastrophic failure if left unchecked. Identifying the root cause quickly is critical.
Potential Causes
- Coolant pump damage or clogged passages reduce flow, decreasing cooling capacity.
Troubleshooting Tips: Replace the water pump if impeller fins are damaged or passages blocked.
- A stuck closed thermostat prevents coolant circulation, leading to overheating.
Troubleshooting Tips: Test thermostat opening temperature and replace if out of spec.
- Insufficient coolant from leaks fails to absorb and dissipate heat properly.
Troubleshooting Tips: Pressure test the system, refill the coolant, and repair leaks.
- Debris blocking the radiator restricts critical airflow, reducing cooling effectiveness.
Troubleshooting Tips: Clear any obstructions like bugs, mud or bent fins blocking the radiator.
- Non-functional fan cannot provide supplementary cooling airflow when needed.
Troubleshooting Tips: Verify fan motor operation and wiring integrity.
4. Transmission Problems
Common transmission complaints include difficult shifting, gear slippage under load, and grinding noises, especially when hot. Shifting issues can make driving unpleasant and even hazardous.
Problems are typically most pronounced when towing or during aggressive starts, indicating the transmission is stressed under high loads. Slow shifts and occasional neutrals popping out are other symptoms.
Potential Causes
- Incorrect transmission fluid level or type leads to inadequate lubrication and hydraulic function.
Troubleshooting Tips: Check levels and use manufacturer-recommended fluid. Change fluids fully.
- Excessively worn shift forks and drums prevent smooth gear engagement.
Troubleshooting Tips: Inspect and replace worn shift components.
- Weak detent springs allow gears to inadvertently slip out of engagement.
Troubleshooting Tips: Replace worn or fatigued springs to firmly hold gears.
- Damaged bearings introduce play and gear misalignment, causing grinding.
Troubleshooting Tips: Test input shaft play indicating worn bearings. Replace as needed.
- Overheated clutch plates glaze over, losing friction and eventually slipping.
Troubleshooting Tips: Inspect plates and steels. Replace if glazed or worn.
5. Driveline Vibration
A noticeable shudder or vibration when cruising, especially at certain speeds or under heavy throttle, indicates a possible driveline issue. Vibrations resonant through the chassis reduce ride comfort.
Intermittent vibrations that change with speed or load point to an out-of-balance or worn driveline component. The vibration may emerge over time as components wear.
Potential Causes
- Bad wheel bearings allow play, introducing imbalance and vibration.
Troubleshooting Tips: Check bearings for play indicating wear. Replace as required.
- Bent or damaged propeller shaft is out of balance, creating vibration.
Troubleshooting Tips: Inspect propshaft condition. Have dynamically balanced or replace.
- Worn CV joints introduce play and instability in axles, leading to vibration.
Troubleshooting Tips: Check boots for cracking and joints for looseness or binding.
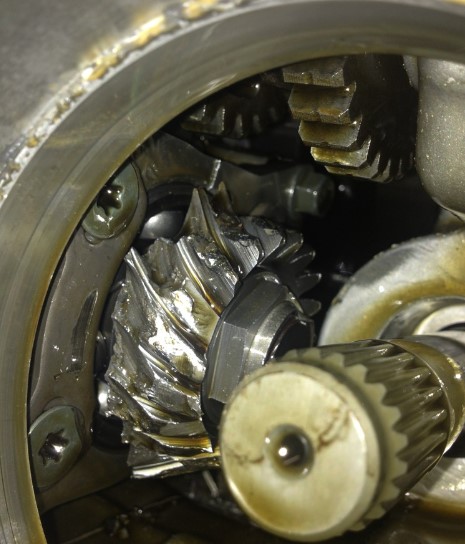
- Pinion bearing wear alters the gear mesh in the differential, creating vibrations.
Troubleshooting Tips: Test by spinning the propshaft – grinding indicates pinion bearing damage.
- Misalignment between components changes angles, potentially worsening vibrations.
Troubleshooting Tips: Measure driveline angles and realign components to specs.
6. Reduced Braking Power
Braking performance degradation presents increased stopping distance, spongy brake pedal feel, and a general lack of responsiveness. This worsens gradually with vehicle use over time.
Reduced braking power is often most noticeable when braking at speed or with a loaded vehicle. Pushing the pedal farther and harder to achieve the desired deceleration is a telltale sign.
Potential Causes
- Trapped air in lines leads to compression and sponginess versus hydraulic pressure transfer.
Troubleshooting Tips: Bleed brakes to remove any trapped air bubbles.
- Contaminated fluid has reduced boiling point and moisture, interfering with hydraulic function.
Troubleshooting Tips: Flush old brake fluid and replace it with fresh DOT4 fluid.
- Excessively worn pads and rotors reduce the frictional contact area for braking.
Troubleshooting Tips: Inspect pad and rotor thickness. Replace if under specified minimums.
- Corroded or stuck caliper pistons inhibit proper engagement with rotors.
Troubleshooting Tips: Clean caliper pistons and lubricate pins, slides, and bushings as needed.
7. Steering Wobble
Excess play or oscillation felt through the steering wheel (especially at higher speeds) indicates potential issues with steering components.
Steering wobble progressively worsens as the source(s) of looseness worsens over time. If left unchecked, it can seriously impact control and stability.
Potential Causes
- Worn tie rod ends introduce play from abrasion wear over time.
Troubleshooting Tips: Inspect tie rods for play indicating wear. Replace as needed.
- Loose wheel bearings allow the wheel hub excessive movement, leading to instability.
Troubleshooting Tips: Check bearings for play indicating wear. Replace immediately if looseness is detected.
- Contaminated ball joints from torn boots wear rapidly, causing play.
Troubleshooting Tips: Verify ball joints have no play or damaged boots. Replace if worn.
- A loose or damaged steering shaft bearing allows play at the steering column.
Troubleshooting Tips: Check the steering stem bearing for smooth operation without play or roughness.
- Misaligned wheels are unable to track straight, leading to wheel wobble.
Troubleshooting Tips: Perform full front wheel alignment to factory specifications.
8. Electrical Gremlins
Problems like dim or flickering lights, starter issues, and random electrical failures point to faults in wiring or components.
Electrical issues tend to appear gradually over time. Vibration, moisture, and corrosion slowly damage the wiring and connections. Shorts can also develop in aged wiring from insulation cracks.
Potential Causes
- Corroded or loose connections cause high resistance and electrical faults.
Troubleshooting Tips: Visually inspect wiring condition. Clean and tighten all connections.
- Damaged insulation allows exposed wires to short to ground or other circuits.
Troubleshooting Tips: Check circuits for unwanted continuity indicating shorts. Repair insulation or replace damaged wiring.
- Overloaded or faulty circuits draw excessive current, leading to failure.
Troubleshooting Tips: Use a multimeter to isolate faults in individual circuits. Address overloaded circuits.
- Weak battery cannot provide sufficient current to components under heavy load.
Troubleshooting Tips: Load test battery condition and charge fully or replace if unable to hold charge.
- Defective switches, sensors or controllers provide incorrect signals.
Troubleshooting Tips: Methodically test components for correct input/output signals and operation.
9. Leaking Fluids
Fluid leaks (oil, coolant, transmission, etc.) result from compromised seals and gaskets as components age and materials deteriorate.
Small leaks tend to gradually progress over time as temperature cycles and vibration further degrade seals. Fresh fluid stains indicate new leaks, while accumulations identify ongoing seepage issues.
Potential Causes
- Hardened, cracked, or misaligned seals and gaskets allow leaks at joints.
Troubleshooting Tips: Inspect the condition of seals. Replace any visibly worn, dried out or damaged seals.
- Weak radiator cap unable to hold the designed system pressure leads to coolant overflow.
Troubleshooting Tips: Pressure test coolant system. Replace the cap if unable to maintain pressure.
- Misaligned components place stress on seals, leading to premature failure.
Troubleshooting Tips: Realign components within tolerances to minimize seal wear.
- Worn brake system seals result in loss of fluid pressure and leaks.
Troubleshooting Tips: Identify worn seals and replace them. Check piston seals and replace them as needed. Use brake cleaner to find pinpoint leaks.
10. Suspension Noises
Clunking, knocking, or creaking from the front or rear suspension over bumps indicates worn components. Noises typically increase gradually as components age.
The suspension noises tend to be most pronounced at low speeds going over bumps or ruts, as the impact articulates the worn joints and bushings. Allowing wear to progress can lead to handling issues.
Potential Causes
- Dry pivots and bushings allow excessive movement under stress.
Troubleshooting Tips: Lubricate pivot points to minimize binding and wear.
- Cracked or broken coil springs allow uncontrolled articulation.
Troubleshooting Tips: Inspect springs for damage. Replace coils if broken or sagging.
- Loose or missing hardware leads to instability and noise over impacts.
Troubleshooting Tips: Check for any loose or missing bolts, nuts, or other mounting hardware.
- Damaged wheel bearings allow looseness, leading to grinding and knocking.
Troubleshooting Tips: Inspect bearings for roughness or play indicating wear. Replace it immediately if damage is found.
11. Engine Smoking
White or blue exhaust smoke is a telltale sign of internal engine issues allowing combustion gases to escape into the exhaust.
Oil smoke typically appears under acceleration as worn piston rings allow oil past the cylinders. Coolant smoking is more common at idle as combustion leaks into the cooling system. Persistent smoke will gradually foul spark plugs as well.
Potential Causes
- A brown head gasket allows coolant and combustion gases to mix.
Troubleshooting Tips: Pressure tests the cooling system to verify gases in coolant indicating a head gasket failure.
- Worn valve guide seals allow oil to be sucked into the combustion chamber.
Troubleshooting Tips: Inspect the guide seal condition and replace it if worn.
- Damaged piston rings fail to properly seal combustion pressure.
Troubleshooting Tips: Perform a leak-down test to verify compression is leaking past rings.
- Clogged air filter causes incorrect fuel mixture, leading to smoking.
Troubleshooting Tips: Replace the air filter element to restore proper airflow.
12. Fouled Spark Plug
Hard starting combined with a blackened or sooty spark plug indicates the plug is fouled from debris buildup. This gradually reduces performance over time.
Fouling is typically caused by persistent low-speed operation, excessive idling, a rich fuel mixture, or a weak ignition system failing to fully burn off deposits.
Potential Causes
- The low-speed operation fails to burn off carbon deposits, leading to accumulation.
Troubleshooting Tips: Drive at highway speeds to clear debris from the plug. Consider lighter spark plug grade to reduce fouling.
- Excess idling allows carbon buildup on plug electrodes, insulating them.
Troubleshooting Tips: Limit unnecessary idling to reduce fouling deposits.
- Weak ignition system output prevents complete plug firing, allowing buildup.
Troubleshooting Tips: Test ignition coil output. Replace the coil if low or intermittent.
- Rich fuel mixture ashes spark plug tip as combustion byproducts collect.
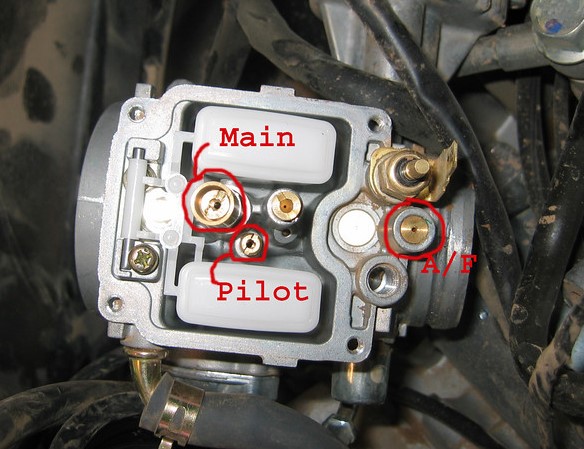
Troubleshooting Tips: Inspect the fuel system and adjust the mixture. Ensure the carburetor is tuned to specifications.
13. Parasitic Battery Drain
The battery slowly discharges over several days or weeks when the ATV is stored, indicating some system or component is drawing current when switched off.
And the drain is “parasitic” in that it continues even when the vehicle is parked. As the discharge cycle repeats, the battery will eventually go dead.
Potential Causes
- Damaged wiring shorting to the ground drains the battery when switched off.
Troubleshooting Tips: Carefully inspect wiring harness insulation for breaches allowing shorts. Repair or replace damaged sections.
- Accessories left switched on like lights or winch motor.
Troubleshooting Tips: Disable accessories one by one to isolate the circuit pulling current.
- Sticking relay or solenoid contacts provide the current path when it is supposed to be off.
Troubleshooting Tips: Test major solenoids like the starter relay for sticking contacts not opening fully. Replace if sticking is observed.
- Computer modules fail to enter sleep mode and continue to draw current.
Troubleshooting Tips: Wake/sleep test PCM and other modules. Check for software issues and module current draw when parked.
14. Tire Cupping / Flat Spotting
Cupped, scalloped, or flat tire treads point to alignment or suspension issues, allowing improper tire wear and uneven tread contact.
Tread cupping typically develops gradually and is most visible on the front tires. The rough ride from cupped tires will worsen as the tire damage increases.
Potential Causes
- Loose wheel bearings allow improper wheel angles under cornering loads.
Troubleshooting Tips: Check for play indicating loose bearings allowing misalignment. Replace loose bearings immediately.
- Worn ball joints develop play, causing dynamic alignment changes and spotty wear.
Troubleshooting Tips: Inspect ball joints for any play or loosening. Replace if worn or damaged.
- Bent axle shafts prevent proper toe alignment as the wheel position shifts.
Troubleshooting Tips: Check axle straightness for any bending or distortion. Replace bent axles.
- Poor toe alignment leads to tread scrubbing and uneven wear over time.
Troubleshooting Tips: Have full wheel alignment done to factory specifications, adjusting the toe as needed.
15. Transmission Shifting Delays
Slow, sticky shifting when moving the shifter lever indicates internal wear inside the transmission.
Symptoms include grinding when engaging a gear and the transmission hesitating before engaging. Delays typically worsen over time as wear progresses.
Potential Causes
- Weak detent springs allow excessive play before gears engage.
Troubleshooting Tips: Replace worn shift springs to firmly hold gears in position.
- Sticking shift forks fail to smoothly engage desired gears.
Troubleshooting Tips: Lube and inspect shift fork pivots for binding. Replace if excessively worn.
- Excessively worn shift drum grooves allow gears to over-rotate before engaging.
Troubleshooting Tips: Inspect drum grooves for abnormal wear, measure and replace if out of spec.
- Damaged internal shift components create binding or looseness.
Troubleshooting Tips: Inspect shift lever, rods, collars and other internals. Replace any visibly damaged parts.
Maintaining Your Rhino 660
Preventative maintenance is crucial to avoiding problems and keeping your Rhino running strong. Follow the recommended maintenance intervals and procedures detailed in your owner’s manual. Key things to watch include:
Change Engine Oil and Filter Regularly
As oil breaks down over time, losing lubrication properties leads to increased component wear. Stick to the specified interval, such as every 20-30 hours of operation or 4-6 months.
Clean the Air Filter After Every Ride
The filter will become clogged with dust and debris from off-road operation. A restricted air filter can reduce power.
Check Brake Fluid and Change Every 2 Years
As moisture absorption in fluid leads to reduced boiling point and corrosion over time. Sticking calipers and brake fade are signs of old fluid needing replacement.
Inspect Front and Rear Suspension Joints
As boot tears and dried-out joints from off-road use can allow contaminants and wear. Listen for knocking and popping, indicating worn components.
Check CVT Belt Condition and Adjust Deflection
As a worn belt will slip, reducing response, set deflection spec periodically to maintain grip and prevent overheating.
Flush and Change Coolant Every 2 Years
Since additives deplete and corrosion can build up in old coolant, leading to reduced effectiveness and cooling system clogs.
Check Tire Pressures and Condition Before Each Ride
As low pressure reduces handling performance and tread life while also risking flats. Replace excessively worn tires.
Lubricate All Pivot Points and Controls
As joints dry out especially after washing, movement will be sticky, indicating the need for fresh lubrication on components like ball joints, bushings and linkages.
Regular maintenance enhances reliability, prevents bigger issues and keeps your Rhino performing optimally on every ride.
When to Call in a Professional Yamaha Technician?
While common issues can be DIY repairs, more complex problems affecting engine internals, electronics, or emissions systems may require dealer diagnosis and repair.
Seeking professional help can also be prudent in these situations:
- Issues that reappear shortly after DIY repairs
- Electrical problems not resolved through basic troubleshooting
- Lack of proper tools, manuals or mechanical skills for certain repairs
- Major engine or transmission disassembly/rebuilds required
- ECU tuning is needed to resolve running issues
The right tools, skill and experience make dealership technicians an invaluable resource when your own mechanical capabilities are stretched too far.
Aftermarket Upgrades and Replacement Parts
Many owners choose to upgrade their Rhino’s durability, performance and aesthetics with aftermarket parts. Some popular upgrades include:
- Heavy-duty axles, differential guards and skid plates
- Lifting kits and shocks for greater ground clearance
- Engine performance mods like exhaust, programmers and intakes
- Winches, bumpers and other accessories
- High-capacity batteries for more starting power
- Custom wheels and tires for specialized applications
Sticking with OEM or high-quality aftermarket replacement parts is advised, especially for critical components.
Final Evaluation
The Yamaha Rhino 660 remains a highly capable and exciting UTV, provided any problems are properly diagnosed and addressed.
While repairs can seem intimidating, methodical troubleshooting, quality replacement parts and preventative maintenance will keep your Rhino running strong for years of off-road fun.